What Photography Will Look Like By 2060
Posted Thursday, August 27, 2009
Popular Photography has published a fascinating and fanciful article on what photography will look like in 2060.
It is Sunday, July 18, 2060:
Old-Timers' Day, Yankee Stadium.
You're here with your old photoglove, getting some action shots from your seat in the upper deck without even putting down the $40 beer in your left hand. What would look to us like normal sunglasses are in fact camera-equipped goggles with a heads-up display on the inside of the right lens.
Pointing the index finger of the photoglove, which is impregnated with tiny pyramid-shaped crystal microlenses surrounding nano-sized image sensors, you draw a frame around each bit of action so that a window appears to float in front of your goggles.
It goes on. Good stuff.
Labels: photography
Big Books! Apple Releases iPhoto 8.1
Posted Tuesday, August 18, 2009
Apple has released iPhoto 8.1, and the new version introduces a larger-than-ever hardcover book size: 13 by 10 inches. (The 11 by 8.5-inch hardcover designs are still available.)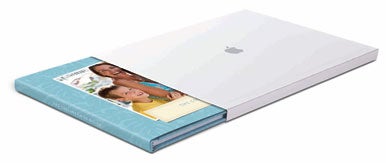
The new update also introduces some new book and greeting card themes.
As I say in my book, "Don't just print your photos. Publish them."
Labels: books, iphoto, photography
Thrifty Frames and Curious Walls: Doing Right By Your Photos
Posted Wednesday, August 12, 2009
"Hanging artwork on the wall without a frame is evil. It's like arranging roses in a vase without water."
So writes my friend Elin in London in a blog post that has inspired me to print and frame some of my favorite photos. I have a stack of unused frames, all victims of my profound ability to procrastinate. No more.
Labels: photography
85 Vintage Photo Ads
Posted Friday, August 07, 2009
Popular Photography's web site has published a great gallery of vintage photography ads.
I actually remember seeing some of these when they ran. But I won't tell you when that was.
Labels: photography
Flickr Search Finally Gets Smart
Posted Tuesday, August 04, 2009
As a slobbering Flickr addict, I'm thrilled to read this: Flickr search finally gets smart.
Labels: flickr, photography
Nikon Camera Contains Built-in Projector
Now this is something completely different. Nikon's just-announced Coolpix S1000pj is a point-and-shoot camera that contains a built-in projector capable of projecting on a screen up to 40 inches across. Crazy!
I like the camera's specs, too: 12.1 megapixels, ISO speeds up to 6400, and VR image stabilization. It lists for $430 and hits stores in September. Engadget has published the press release.
Labels: photography
Five Things You Didn't Know About Scanners
Posted Friday, July 17, 2009
Popular Photography has published a short but interesting article about scanners.
I knew a couple of the items, particularly the "scanning film is better than scanning prints" item. Indeed, I write about this in the section of my book that deals with getting old photos into iPhoto.
But the "CCD sensor is better than a Contact Image Sensor" business -- I did not know that. More research is needed. Ah. A quick detour to Wikipedia provides some brief details on Contact Image Sensors. Hmm. Seems like they're a low-cost sensor alternative that doesn't provide the same potential image quality as a CCD-based scanner.
Labels: photography, scanners
How to Photograph Fireworks
Posted Thursday, July 02, 2009
Every year at this time, as the US Independence Day nears, photography magazines and Web sites run articles on how to photograph fireworks.
This year is no exception.
Have a safe and happy July 4, no matter where you live!
Labels: photography
Photojojo's Guide to Kodachrome
Posted Thursday, June 25, 2009
The always-wonderful Photojojo e-newsletter has a tribute to Kodachrome, the venerable slide film that Kodak is going to be discontinuing.
I haven't shot a roll of Kodachrome in at least ten years, but I shot many hundreds of rolls of it before that. Now I'm inspired to scan those old slides.
There have been a lot of great homage-to-Kodachrome articles and blog posts this past week, but I'm still looking forward to one that doesn't mention Paul Simon.
I guess this isn't the one, is it?
Labels: kodachrome, photography
Field-Testing the Camera in the New iPhone 3GS
Posted Monday, June 22, 2009
How good is the camera in the new iPhone 3GS? Quite good.
This shot, which illustrates the tap-to-focus controls in the camera, is particularly impressive.
Labels: camera, iphone 3gs, photography
20 Easy Techniques For Improving Your Photos
Posted Friday, June 12, 2009
Popular Photography's 20 Easy Techniques For Improving Your Photos is a nice little collection of, um, 20 easy techniques for improving your photos.
Labels: photography
Expert Tips on Photographing Your Pets
Posted Tuesday, May 19, 2009
The New York Times has a nice little article on photographing pets. Which is one of my favorite activities.
Labels: photography
Lighting: Green Scheme for iMovie '09 Fun
Posted Friday, May 15, 2009
Popular Photography's site has a nice little piece on a $249 lighting kit that looks perfect for use with iMovie '09's new green-screening feature (you know, that feature that lets you do the "weather forecaster standing in front of a map" thing).
The Photo Basics uLite Video Lighting Kit includes two lights with softboxes (which, true to their name, provide a diffused, even light -- important for getting good green-screen results), and what looks like a generous bolt of green fabric, complete with stands for supporting it. It looks nice, not just for green-screening, but for all your interior lighting endeavors.
The article contains a couple of nice lighting tips, too. Check it out, and have a green weekend!
Monday's the day! Me, I'll be parked in front of my Mac most of this weekend, because the iLife '09 edition of my book goes to the printer on Monday. The word "yay" only begins to approximate my delight. The new edition will be the most beautiful yet. See the sidebar at right to pre-order yours!
Labels: imovie, lighting, photography
10 Online Photography Magazines
Posted Monday, May 11, 2009
The always-delightful Photojojo has compiled a list: 10 Online Photography Magazines We Love.
Lots of great exloring here.
Labels: photography
20 Photography Twitters Worth Following
Posted Sunday, April 19, 2009
Oprah apparently isn't the only person using Twitter. Popular Photography puts forth a list of the top twenty photography Twitters worth following.
Labels: photography
30 Photo-Friendly Cities...According to Them
Posted Thursday, April 02, 2009
Popular Photography magazine has fired up its copy of Excel, pecked in some occasionally stupid criteria, and come up with its list of the top thirty photo-friendly cities in the US.
As I said, I think a lot of the criteria are worthless. Per-capita number of camera stores? Number of sunny days per year? I don't know about you, but neither factor has ever entered my mind when I venture out with my camera.
Maybe I'm just bitter because my home town of Pittsburgh, PA -- with its beautiful rolling hills, dramatic skyline where rivers converge, and historic architecture -- didn't even make the cut.
Feh.
Labels: photography
2009's Hot Digital Cameras on Parade
Posted Friday, March 06, 2009
PC World's web site has a nice summary of some of the hottest cameras that were showing at last week's 2009 Photo Marketing Association convention in Las Vegas.
Of course, I want them all.
Labels: photography
Do Men and Women Take Different Photos?
Posted Thursday, March 05, 2009
Here's an intriguing article from Popular Photography.
And while you're online, use the Software Update system preference to grab the latest iPhoto update (8.0.1) and iLife support update (9.0.1) -- both appeared earlier this week.
Labels: photography
2008's Best Digital SLRs for Newbies
Posted Sunday, August 10, 2008
Ready to move beyond your point-and-shoot digital camera? Good for you. For so many reasons -- better image quality, more exposure controls, a vast selection of lenses, and more creative options -- a digital SLR is the way to go.
ShutterPad.com has published a nice overview of the best digital SLRs for beginning photographers. The site recommends choosing between Canon and Nikon due to each company's commanding presence in the photography business. And the top-recommended digital SLR for beginners? The Canon XSi.
Labels: photography
Have a Nikon or Fuji Digital SLR? Know Where It Is
Posted Wednesday, August 06, 2008
Accessory manufacturer Wolverine Digital has announced the Wolverine GEO, a $189 GPS receiver that adds location information to photos taken with certain Nikon and Fuji digital SLRs.
The GEO attaches to the flash shoe of the camera and draws power directly from the camera's battery. You can easily integrate "geotagged" photos into mapping programs, such as Google Earth. And if you're a fan of Flickr, the geotagging data are automatically uploaded when you add photos to Flickr.
According to the site, the GEO ships soon. I want one for my Nikon D200.
Labels: photography
The Five Essential Camera Settings You Must Know
Posted Tuesday, July 22, 2008
I talk about much of this in the iPhoto chapter of my book, but this article is an excellent summary of the five essential settings -- shooting mode, aperture, shutter speed, ISO sensitivity, and exposure value -- that every avid digital photographer should know.
Go forth and master.
Labels: photography
Panorama How-to: Sky Stitches
Posted Thursday, July 17, 2008
Use Photoshop to create amazing panoramas with great skies in just a few easy steps. From Popular Photography.
Labels: photography
The Photographer's Guide to the Eye
Posted Thursday, July 10, 2008
Learning how we see can help you take better photos: a fascinating article from Popular Photography.
Labels: photography
Have a Digital SLR? You Need a "Nifty 50"
Posted Tuesday, July 08, 2008
For a whole bunch of reasons, one of the best lenses you can have for your digital SLR is a 50mm prime (that is, non-zoom) lens.
Here's why.
Labels: photography
Nikon D700 Hands-On Preview
Posted Tuesday, July 01, 2008
Digital Photography Review has a hands-on preview of the Nikon D700, which ships this month for $2999 (body only).
12 megapixels, full-frame sensor, and many other swoon-worthy features.
Labels: photography
How to Make Stop-Motion Video Shorts with Your Digital Camera
Posted Friday, June 27, 2008
Another great little tutorial from our friends at Photojojo.
Labels: photography
Steady Now: How to Reduce Camera Shake
Posted Thursday, June 26, 2008
As I say in my book, I like to shoot photos with my camera's flash turned off. But that usually means longer shutter speeds, and that introduces the risk of blur due to camera movement.
Here is a nice set of tips for reducing camera shake.
Labels: photography
A Sweet Photo Gift: Photo M&Ms
From the ever-fun Photojojo comes news that'll melt in your mouth, not in your hand: you can now get M&M candies with your photos printed on them.
Sweet!
Labels: photography
Now In Progress: Polaroid Week 2008
Posted Monday, April 21, 2008
Over on Flickr, 'Roid Week 2008 has begun. It's a five-day celebration of Polaroid instant photography -- and, for those of us who have become addicted, a sad mourning for the format's apparent demise. (Polaroid has announced that it will stop making instant films over the next next year.)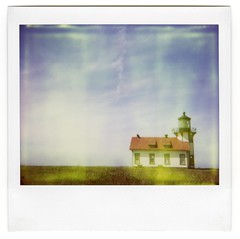
Becoming smitten by low-fidelity "instant" photography in a digital age is a weird thing: you buy a $4 Polaroid Spectra at a local thrift shop, and find an expired pack of film on eBay (expired film often produces odd and unpredictable color shifts, as shown here).
Then you scan the result with a $500 scanner, touch up the dust specks with Adobe Photoshop CS3, and post the result using a $3000 computer.
Hey -- no one ever said photography had to make financial sense.
Happy 'Roid Week!
Labels: photography
Made You Look: Adobe Photoshop Express
Posted Wednesday, March 26, 2008
Adobe has launched a public beta of Photoshop Express, an impressive on-line photo-editing and sharing site.
I just spent a few minutes tinkering, and it looks cool. From an editing standpoint, there's nothing here that iPhoto '08 can't do and that the new Photoshop Elements 6 can't do even better. But for the social networker -- the Facebook addict, the Flickr junkie (support is forthcoming) who isn't obsessed about having every image-editing tool in the toolbox, Photoshop Express looks great.
And it's an impressive example of the kinds of Web applications that crystal ballers say are a big part of the software industry's future.
Macworld.com has more.
Labels: adobe, photography, photoshop express
Attention Flickr Addicts: New Version of FlickrExport Plugin for iPhoto
Posted Wednesday, March 05, 2008
Fraser Spears has made available a pre-release version of FlickrExport 3, the latest version of the iPhoto plug-in that I use to upload my photos to Flickr.
One significant enhancement in the new version is the ability to submit a photo to multiple Flickr groups in one fell swoop -- a huge timesaver. (But remember, Flickr friends, submitting to more than eight or 10 groups is considered bad form.)
FlickrExport 3 also supports geotagging in several cool ways. A pre-release version for Apple's Aperture is also available.
Labels: flickr, flickrexport, ilife imovie iphoto imoviehd, photography
Apple TV "Take Two" Flickrs Dimly
Posted Tuesday, February 19, 2008
I've been a happy Apple TV owner since last year, when I bought one so that I could cover it in the new edition of my book. I love Apple TV's ability to store my iTunes library and tap into the libraries of other computers on my network. Music, videos, movies, playlists, all accessible through my TV and stereo system? Yay.
But as an obsessed amateur photographer, I was particularly smitten by the ability to view my photos on my flat-screen TV. Indeed, in a world where high-definition video is relatively sparse (how many times can you watch a high-def cheetah tear apart a wildebeest?), I found that my photos were the best way to show off what a high-definition TV set can really do.
So you can imagine my delight when Apple announced that its Apple TV "Take 2" software update would support Flickr, the online photo sharing service that I am, um, somewhat fond of.
Last week, I downloaded the "Take 2" update. Its enhancements have been described in great detail elsewhere, and they're generally terrific. The ability to buy music from the iTunes Store from the comfort of my Barcalounger is not going to help lower my credit card balance.
But I haven't seen a detailed look at the Flickr support in Apple TV "Take Two". It's a bittersweet story, exciting and disappointing at the same time.
The Sweet Part
Setting up Apple TV to view Flickr photos is easy. Navigate to the Flickr screen, and use the Apple TV remote control to enter the name of a Flickrite. Apple TV displays a menu showing that person's most recent photos as well as his or her sets (Flickr's term for what iPhoto calls an album), favorites, and Flickr contacts.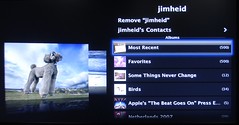
(Click the photo for a larger version.)
To view a set of photos, use the Apple Remote to select the set, then press its Play button. And this is when the sweet part kicks in: Apple TV displays a slide show of the photos, with a cross-dissolve transition between each. You can also set up slide shows to automatically pan and zoom across photos (the so-called Ken Burns effect). And, as with photos stored on Apple TV's hard drive, you can have a music soundtrack play.
It's sheer bliss.
Sitting back and immersing yourself in photos like Roamin's on a flat-screen TV as music plays through your stereo? That, my friends, is my idea of must-see TV. Flickr never looked as good as it does through Apple TV. It's spectacular. You'll want to empty your living room of furniture and install a massive video screen and refrigerator-sized speakers.
You can also set up Apple TV's screen saver to display Flickr photos -- also sweet.
The Bitter Part
So what's not to like? Alas, many things, and most of them trace back to one fundamental shortcoming in Apple TV's Flickr support: unlike with YouTube, you can't sign in to Flickr using Apple TV.
No private photos. Flickr lets you upload photos as "private" -- intended for only those contacts who you designate as friend or family. Alas, because Apple TV doesn't let you sign in to Flickr, neither Apple TV nor Flickr knows who you are. If you post photos as private, you won't be able to see them on Apple TV -- nor will you be able to see contacts' photos that are posted as private either. Many Flickrites have complained about this on Apple's support forums. Permit me to add my voice to the chorus.
No adding to favorites. When you encounter a photo you like on Flickr, you can add it to your favorites -- essentially bookmarking it so you can return to it later. Apple TV doesn't let you add a photo to your list of favorites -- again, that would require that you be able to sign in to Flickr.
No groups, no searching. One of the best things about Flickr is the ability to join, contribute to, and browse groups containing similar photos -- such as the Polaroid group, whose members are lamenting Polaroid's recent announcement to discontinue instant film next year. I'd love to be able to view a group's photos as a slide show on my TV. Can't do it.
Similarly, you can't search for photos using Apple TV.
No Explore! Flickr's Explore page is the gateway to the most "interesting" photos uploaded to Flickr. I'd love to be able to view a slide show of Flickr's most interesting photos. Can't do it.
Think of It as Flickr "Take One"
I realize that Apple TV "Take Two" wasn't about creating the perfect marriage between Flickr and your TV. No, the new software update was about introducing movie rentals and iTunes Store purchasing.
But now that Apple has accomplished that, I hope future Apple TV software updates will add the same degree of support for Flickr that Apple TV provides for YouTube -- the ability to sign in, to search for photos, to add items to your favorites, and so on. The Flickr support in Apple's "Take Two" update is a great start, but it's just a glimmr of what's possible.
Labels: apple tv, flickr, photography, youtube
Build Your Own Macro Light Studio
Posted Thursday, February 08, 2007
I love to take ultra-close macro photos (view my Flickr macros). If you do, too, you can greatly improve your lighting by building a light box like the one shown here on Flickr (for more details, click the photo).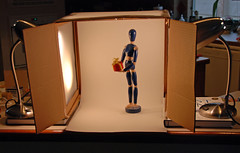
And if you prefer to buy rather than build, check out the EZcube. I've been using EZcubes of various sizes for years, and they're great.
Labels: ezcube, flickr, lighting, macro, photography
Popular Photography Test: Nikon D-40 Digital SLR
Posted Wednesday, February 07, 2007
Popular Photography has published its complete test of Nikon's entry-level D40 digital SLR.
The Nikon D40 isn't for everyone, but it will certainly appeal to first-time DSLR buyers who want an excellent camera with controls and features that they can grow into and eventually master. It outperforms any compact camera in its price range, and while it has competition from other entry-level DSLRs (especially the Pentax K100D with Shake Reduction) it's a proud member of the Nikon family.
Labels: d40, nikon, photography
Top Ten Flickr Hacks
Posted Friday, January 26, 2007
From Thomas Hawk's Digital Connection: the Top Ten Flickr Hacks. Great stuff here for slobbering Flickr addicts such as myself.
Labels: flickr, photography, web
"Popular Photography" On Photo Restoration
Posted Thursday, January 25, 2007
The venerable Popular Photography magazine has a nice, step-by-step tutorial on restoring old photographs.
And by the way, check out my new license plates.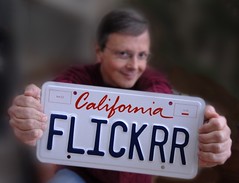
Labels: photography
I See the Light: Discovering Off-Camera Flash for a Digital SLR
Posted Friday, December 01, 2006
Kill your flash. Smash your flash. Embrace existing light.
They're phrases I've always used and believed in fervently. I've written them in my books, I've preached them at seminars, I've scrawled them on bathroom walls.
And with good reason: there isn't a less-flattering light source than a camera's built-in strobe. It's directly adjacent to the lens, all but guaranteeing red-eye and other ugly eye reflections. Its position on the camera means your subjects will be illuminated straight-on, giving their faces a flat, unflattering look�and they'll probably have hideous shadows behind them.
Simply put, if you want a photo to look like it was shot during a 1950s atomic bomb test, use your flash.
That was before. That was then. I've gone from a flash hater to a flash lover. From a flash smasher to a strobist.
What changed? I got a real flash.
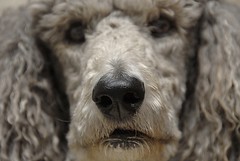
Flashy
Originally uploaded by jimheid.
I shot this photo of Sophie at point-blank range�about 18 inches away from her sweet silvery face. Try that with your camera's built-in flash, and you'll get an awful picture. You might even blind your dog.
What's the secret? I recently took delivery (I love the archaic sound of that phrase) of Nikon's top of the line speedlight (another delightfully archaic-sounding term), the roughly $300US SB-800.
There's more computing power in this speedlight than there was on the Apollo moon rockets. The speedlight and the camera (in my case, a Nikon D200) are in constant communication. Adjust the camera's zoom lens, and a motor in the speedlight moves the strobe element back and forth to cast an appropriate-sized beam. An LCD on the back of the flash reads out the current aperture, zoom setting, and shutter speed. Turn on the backlight of the camera, and the flash backlight comes on, too. The speedlight even has a multi-fire mode that lets you get those "frozen golf swing"-style multiple exposures in a single shot (more resources for the SB-800).
And the little touches are there, too. When the flash is in bounce position�pointed upwards at the ceiling, so its light is softened�there's a little white "fill card" that you can pull out of the top to toss a bit of direct light on the subject.
What excites me the most about the SB-800 and D200 combination, though, is wireless. The camera and flash can communicate with each other using infrared signals, and by tweaking some menu settings on both, you can set up what's called commander mode. (Wasn't he a Star Trek character?) In commander mode, the flash can be anywhere in the room�or even just around a corner�and the camera will trigger it. With this kind of flexibility, you can position the flash in ways that turn its brilliant strobe into soft, flattering pools of delicious light.
It's all part of what Nikon calls the Creative Lighting System, and it and similar wireless technologies are all the rage among wedding, event, news, and commercial photographers.
Don't shoot Nikon? There are similar options for other camera systems, and the best place I've found to learn about the entire world of off-camera lighting, as it's sometimes called, is a blog called Strobist. Published by a David Hobby, a newspaper photographer, it's an incredibly informative, utterly inspiring place to learn about light. And, of course, it has a companion Flickr group.
Smash your flash? Not anymore. My new bathroom wall scrawl is "Get a real flash, then take it off the camera and learn how to use it." It isn't quite as pithy, but it reflects reality. It isn't flash that's evil. It's poorly used flash that's evil.
I love discovering a new avenue to explore.
Labels: flash, nikon, photography
Have a Digital SLR? You Need a Lensbaby
Posted Monday, September 25, 2006
Sunday Morning
Originally uploaded by jimheid.
My friend and eBay coauthor Toby gave me a fabulous present the other day: a Lensbaby. This is a device that gives your expensive digital SLR optical characteristics similar to that of a cheap Soviet toy camera.
Actually, it does so much more. Check out the site to learn more.
Sorry for the lapse in posts. I've been busy playing! I'll have some iTunes goodies for you soon.
Oh, and Aperture 1.5
Apple today announced a new version of Aperture, it's pro-level photography applications. Aperture 1.5 has some great new features, including direct support for iPhoto libraries.
And it's a free upgrade for existing Aperture users. Nice.
Labels: lensbaby, photography
Think All Memory Cards Are Alike? Think Again
Posted Wednesday, September 06, 2006
Popular Photography reports on five memory card innovations, from high-speed cards to the latest microdrive cards to cards designed for forensic imaging to cards containing built-in USB ports�no media reader required.
Interesting stuff.
Labels: memory, photography
How Addicted to Photography are You? Let iPhoto Tell You
Posted Monday, August 28, 2006
I'm taking a lot of photos lately. Since falling passionately in love with a Nikon D200 digital SLR back in March, I've taken 4,375 photos. In May, I took 1018 of them. On July 17, I took 122.
How do I know? iPhoto told me so. There are several ways to do very precise photo counts in iPhoto. Conducting a census of your imagery might not be the most fun you can have while sitting at your Mac, but it can be interesting.
Here's how to do it.
The Calendar Pane
The key to photo counts in iPhoto is the Calendar pane, which you can display by clicking the small calendar button in the lower-left corner of the iPhoto window.
The Calendar pane can display an entire year or a specific month. 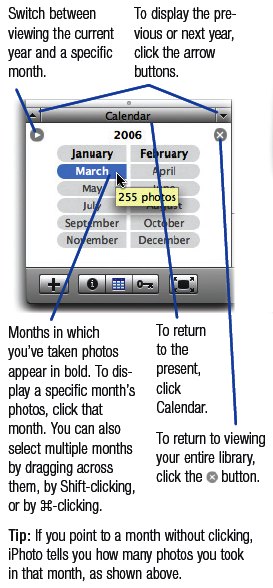
As this excerpt from my book shows, you can get a photo count for a specific month by simply pointing to that month. (Just point; don't click.) Similarly, if you're viewing a specific month's calendar, you can get a photo count for a given day by pointing to the day.
But there's more. To get a photo count from more than one month, simply drag across the months to select them. As you do, iPhoto displays the number of photos at the bottom of its window. Similarly, to get a photo count from more than one day, drag across a range of days in the Calendar pane.
Want More Calendar Pane Details?
You'll find lots of details about the Calendar pane and other iPhoto browsing techniques in the world's top-selling iLife book, which is still going for just $23.09 on Amazon�34 percent off the cover price. Order now.
Want details right now? Download an excerpt from the iPhoto chapter (300K PDF).
Update on the Redesign
The redesign of this site is coming along. Since updating the look of the home page last week, I've since incorporated the new look into the iTunes and iPhoto pages. I've also revamped those pages to make them more useful: in the leftmost column of each page, you'll find links to the latest iTunes and iPhoto updates as well as constantly updated news on digital music and digital photography. You'll also find a shameless e-commerce column that lets you order goodies from Amazon and, in the process, help put a couple of dog biscuits in Sophie's maw.
I'll be gradually applying the new look to the remaining product pages in the days and weeks to come. And I still have to edit most of my archived postings so that they format correctly (specifically, so that the headings operate as permalinks).
Oh, and all those photos I've been shooting? You'll find my favorites on Flickr�my other serious addiction.
Labels: iphoto, photography
Making Postcards from Your Photos: A Fourth Way
Posted Monday, July 17, 2006
Summer is a time of travel. I'm on the road right now, typing this in a Southwest Airlines jet that's parked at the gate awaiting the arrival of its flight crew. Sigh. Good thing the WiFi at California's Oakland International Airport extends to the tarmac.
Travel means postcards, and postcards are the subject of this dispatch. I've already sung the praises of Photojojo, a cool e-newsletter containing digital photography tips. The latest Photojojo covers three techniques for creating postcards. They're swell tips, but as iLife users, we have a fourth option: iPhoto 6.
The latest iPhoto lets you create postcards with a few mouse clicks: select a photo in your library, click the Cards button at the bottom of the iPhoto window, and then choose Postcard in the subsequent dialog box.
You can choose from several postcard designs; I like the Picture Card theme, which simply fills the card with your photo � no little hearts, flowers, or geegaw graphics for me, thank you.
Refining Your Card's Design
After you choose a theme, you can order your card by clicking the Buy Card button. But you can also refine your design in several ways. (As I describe in my book, the following design options are also available when you're creating calendars and books in iPhoto.)
Refine the photo. Want to crop the photo to better highlight your subject? Double-click the photo on your card, and then zoom in by dragging the zoom slider that appears above the photo. (If you see what I call the Yellow Triangle of Doom, you've zoomed in too far to get acceptable print quality. Back off until the warning triangle disappears.)
To reposition a photo that you've zoomed in on, drag within the photo.
Optional: add text. You can add a short snippet of text, such as "Greetings from Jersey City," below your photo. From the Design pop-up menu at the bottom of the iPhoto window, choose the design containing text. Next, click the placeholder text on your card and type your missive.
To have your text appear against a black background, use the Background pop-up menu at the bottom of the iPhoto window. I'll describe how to fine-tune the text's font and other formatting shortly.
Finessing the flip side. As with arguments, there are two sides to every postcard. Once you've refined the front of your card, turn to its flip side.
Travel-oriented postcards -- the "wish you were here" variety -- typically don't have envelopes. Other types of postcards � for example, party invitations and birth announcements � often do include envelopes. iPhoto lets you create both kinds of cards.
First, tell iPhoto you want to focus on the flip side of the postcard by clicking anywhere within the flip side of the card. Now turn your attention to the Design pop-up menu. To create what's sometimes called a self-mailing card, choose the lower option from the Design pop-up menu. This gives you a design containing a space for your message and a space to write your recipient's address.
You can type text in the message area or leave the area blank so you can hand-write a message. For a blank message area, there's no need to delete the placeholder text that iPhoto displays.
By the way, if you create a self-mailing postcard, Apple still includes an envelope -- a nice touch that you'll appreciate if your message ends up being, well, a bit personal.
Text formatting tips. You can change the text formatting of your postcard in a couple of ways. The easiest way is to click the Settings button at the bottom of the iPhoto window. A dialog box appears that lets you specify a font and size for each of the elements of the card � the headline that optionally appears on the front of the card, the title and body text that appears on the back, and even the text that appears within the "place postage here" box.
You can also format text by using the Fonts panel: just choose Choose Edit > Font > Show Fonts (or use the Command-T keyboard shortcut). Then, select text that you've typed and choose options in the Fonts panel.
The Fonts panel gives you formatting flexibility that the Settings dialog box doesn't. Using the Fonts panel, you can mix and match fonts and styles within a headline, change the color of text, and even summon alternate ornamental characters that some fonts provide. (I discuss these advanced formatting options at length in my book.)
Postcard Postscript
Apple charges $1.49 (US), plus shipping, for each postcard you order. (If you order 25 or more cards, prices go down.)
Don't want to wait for your card to arrive? Print it yourself. You can print postcards � and indeed, iPhoto book and calendar pages, too � on any printer. To print a two-sided card, be sure to use photo inkjet paper that's capable of two-sided printing.
There's more to iPhoto cards, and I cover it all in my book. Now if you'll excuse me, the flight attendants are arriving with beverages here in sardine class.
Labels: iphoto, photography, postcards