Big Books! Apple Releases iPhoto 8.1
Posted Tuesday, August 18, 2009
Apple has released iPhoto 8.1, and the new version introduces a larger-than-ever hardcover book size: 13 by 10 inches. (The 11 by 8.5-inch hardcover designs are still available.)
The new update also introduces some new book and greeting card themes.
As I say in my book, "Don't just print your photos. Publish them."
Labels: books, iphoto, photography
How Addicted to Photography are You? Let iPhoto Tell You
Posted Monday, August 28, 2006
I'm taking a lot of photos lately. Since falling passionately in love with a Nikon D200 digital SLR back in March, I've taken 4,375 photos. In May, I took 1018 of them. On July 17, I took 122.
How do I know? iPhoto told me so. There are several ways to do very precise photo counts in iPhoto. Conducting a census of your imagery might not be the most fun you can have while sitting at your Mac, but it can be interesting.
Here's how to do it.
The Calendar Pane
The key to photo counts in iPhoto is the Calendar pane, which you can display by clicking the small calendar button in the lower-left corner of the iPhoto window.
The Calendar pane can display an entire year or a specific month. 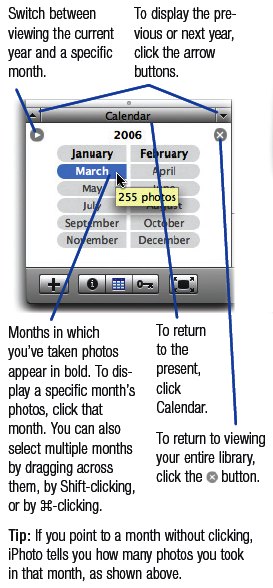
As this excerpt from my book shows, you can get a photo count for a specific month by simply pointing to that month. (Just point; don't click.) Similarly, if you're viewing a specific month's calendar, you can get a photo count for a given day by pointing to the day.
But there's more. To get a photo count from more than one month, simply drag across the months to select them. As you do, iPhoto displays the number of photos at the bottom of its window. Similarly, to get a photo count from more than one day, drag across a range of days in the Calendar pane.
Want More Calendar Pane Details?
You'll find lots of details about the Calendar pane and other iPhoto browsing techniques in the world's top-selling iLife book, which is still going for just $23.09 on Amazon�34 percent off the cover price. Order now.
Want details right now? Download an excerpt from the iPhoto chapter (300K PDF).
Update on the Redesign
The redesign of this site is coming along. Since updating the look of the home page last week, I've since incorporated the new look into the iTunes and iPhoto pages. I've also revamped those pages to make them more useful: in the leftmost column of each page, you'll find links to the latest iTunes and iPhoto updates as well as constantly updated news on digital music and digital photography. You'll also find a shameless e-commerce column that lets you order goodies from Amazon and, in the process, help put a couple of dog biscuits in Sophie's maw.
I'll be gradually applying the new look to the remaining product pages in the days and weeks to come. And I still have to edit most of my archived postings so that they format correctly (specifically, so that the headings operate as permalinks).
Oh, and all those photos I've been shooting? You'll find my favorites on Flickr�my other serious addiction.
Labels: iphoto, photography
Making Postcards from Your Photos: A Fourth Way
Posted Monday, July 17, 2006
Summer is a time of travel. I'm on the road right now, typing this in a Southwest Airlines jet that's parked at the gate awaiting the arrival of its flight crew. Sigh. Good thing the WiFi at California's Oakland International Airport extends to the tarmac.
Travel means postcards, and postcards are the subject of this dispatch. I've already sung the praises of Photojojo, a cool e-newsletter containing digital photography tips. The latest Photojojo covers three techniques for creating postcards. They're swell tips, but as iLife users, we have a fourth option: iPhoto 6.
The latest iPhoto lets you create postcards with a few mouse clicks: select a photo in your library, click the Cards button at the bottom of the iPhoto window, and then choose Postcard in the subsequent dialog box.
You can choose from several postcard designs; I like the Picture Card theme, which simply fills the card with your photo � no little hearts, flowers, or geegaw graphics for me, thank you.
Refining Your Card's Design
After you choose a theme, you can order your card by clicking the Buy Card button. But you can also refine your design in several ways. (As I describe in my book, the following design options are also available when you're creating calendars and books in iPhoto.)
Refine the photo. Want to crop the photo to better highlight your subject? Double-click the photo on your card, and then zoom in by dragging the zoom slider that appears above the photo. (If you see what I call the Yellow Triangle of Doom, you've zoomed in too far to get acceptable print quality. Back off until the warning triangle disappears.)
To reposition a photo that you've zoomed in on, drag within the photo.
Optional: add text. You can add a short snippet of text, such as "Greetings from Jersey City," below your photo. From the Design pop-up menu at the bottom of the iPhoto window, choose the design containing text. Next, click the placeholder text on your card and type your missive.
To have your text appear against a black background, use the Background pop-up menu at the bottom of the iPhoto window. I'll describe how to fine-tune the text's font and other formatting shortly.
Finessing the flip side. As with arguments, there are two sides to every postcard. Once you've refined the front of your card, turn to its flip side.
Travel-oriented postcards -- the "wish you were here" variety -- typically don't have envelopes. Other types of postcards � for example, party invitations and birth announcements � often do include envelopes. iPhoto lets you create both kinds of cards.
First, tell iPhoto you want to focus on the flip side of the postcard by clicking anywhere within the flip side of the card. Now turn your attention to the Design pop-up menu. To create what's sometimes called a self-mailing card, choose the lower option from the Design pop-up menu. This gives you a design containing a space for your message and a space to write your recipient's address.
You can type text in the message area or leave the area blank so you can hand-write a message. For a blank message area, there's no need to delete the placeholder text that iPhoto displays.
By the way, if you create a self-mailing postcard, Apple still includes an envelope -- a nice touch that you'll appreciate if your message ends up being, well, a bit personal.
Text formatting tips. You can change the text formatting of your postcard in a couple of ways. The easiest way is to click the Settings button at the bottom of the iPhoto window. A dialog box appears that lets you specify a font and size for each of the elements of the card � the headline that optionally appears on the front of the card, the title and body text that appears on the back, and even the text that appears within the "place postage here" box.
You can also format text by using the Fonts panel: just choose Choose Edit > Font > Show Fonts (or use the Command-T keyboard shortcut). Then, select text that you've typed and choose options in the Fonts panel.
The Fonts panel gives you formatting flexibility that the Settings dialog box doesn't. Using the Fonts panel, you can mix and match fonts and styles within a headline, change the color of text, and even summon alternate ornamental characters that some fonts provide. (I discuss these advanced formatting options at length in my book.)
Postcard Postscript
Apple charges $1.49 (US), plus shipping, for each postcard you order. (If you order 25 or more cards, prices go down.)
Don't want to wait for your card to arrive? Print it yourself. You can print postcards � and indeed, iPhoto book and calendar pages, too � on any printer. To print a two-sided card, be sure to use photo inkjet paper that's capable of two-sided printing.
There's more to iPhoto cards, and I cover it all in my book. Now if you'll excuse me, the flight attendants are arriving with beverages here in sardine class.
Labels: iphoto, photography, postcards