Posted Friday, July 08, 2005
How to Make a Life Poster, the Tiger Edition
Updated November 4, 2005
Back in January, software developer Mike Matas published instructions on how to use iPhoto to create what he called a "life poster"—a large print comprising a collage of 98 smaller images.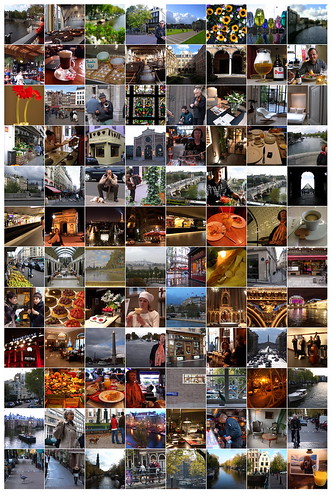 It was an exceptionally cool project that required quite a few steps, not to mention a trip into Photoshop. Could the process be automated? Could it be automated with Automator, the Mac OS X Tiger technology that puts your Mac on autopilot?
The answers to those questions are yes and yeah, baby.
I present your weekend iPhoto fun project: the Life Poster, Tiger Edition. Select 96 photos in your iPhoto library, click a button, then sit back and watch while your Mac does the work of assembling the photos into a spectacular poster.
There's no need to manually crop anything, no need for Photoshop or custom paper sizes, and indeed, no need to do anything except continue to perform that oxygen-to-carbon-dioxide conversion process you do so well. When your Mac is done, you can order a 20- by 30-inch poster through iPhoto.
Here's how to get it all running.
Phase 1: Download and Install
Besides your gorgeous photos, this project has two key components: an Automator action and an Automator workflow. Start by downloading this archive (228K). Then, double-click it to expand it. You'll find an installer named "Thumbnail Poster Installer" on your desktop.
Install the action. In the world of Automator, an action is an item that performs a single, specific task. For this project, you need to install an action that produces the poster.
To install the action, simply double-click the Thumbnail Poster Installer icon. Read the scintillating installation message if you like, then click the Run button. The installer will add the action to Automator and also add a folder named "Thumbnail Poster Files" to your desktop.
If you'd like to verify that the action was installed, launch Automator (it's in your Applications folder). In Automator's Library list, click PDF (it's within the Applications list). You'll see the action listed in the Action column as "Create Thumbnail Poster".
Now you're ready to become a poster child.
Phase 2: Make Your Poster
As I mentioned, this project produces a poster containing 96 photos. Thus, a good place to begin is by corralling 96 photos into an album: in iPhoto, create a new album, and then drag your favorite 96 photos into it. Next, select those photos by choosing Select All from the Edit menu (or pressing Command-A).
Run the workflow. With your 96 photos selected, you're ready to run the workflow. Return to the Finder and double click the Thumbnail Poster Files folder on your desktop, then double-click the workflow inside; it's named "Create Thumbnail Poster.workflow".
Now at this point, patience is a virtue. A necessity, even. The workflow will scan your iPhoto library as a prelude to allowing you specify where your poster will be imported—into a specific album or simply into your library. If you're running this on a slower Mac and you have a large iPhoto library containing a lot of albums, you'll see the spinning pinwheel for a few minutes. Patience.
When the spinning pinwheel disappears, click the Run button in the upper-right corner of the workflow window.
Then do that patience thing again, because your Mac is going to process each of those 96 photos, crop them to a square format (more about this later), render them to PDF files, and then generate the poster image.
Phase 3: Order Your Print
After the workflow runs, you'll find your poster image in your iPhoto library (and in a specific album, if you chose one before running the workflow). Select it, click the Order Prints button, and order your poster.
Prior to ordering your print, you can, of course, modify the image using iPhoto's Adjust panel or using Photoshop or Photoshop Elements. For example, you might want to put a colored border around the montage.
Variations on the Theme
Here are a few variations you might want to try.
Crop Yourself. The square thumbnails created by this workflow may cause some unwanted cropping. If you want square thumbnails and want to be sure that you don't chop someone's head off, crop each of the 96 images manually using iPhoto's Crop tool with the Constrain pop-up menu set to Square.
That's a big job. And remember, cropping a photo changes its appearance in any albums, so you might want to duplicate every photo first, then crop the duplicate. (That a lot more time and disk space than I'm willing to invest.)
Go Horizontal or Vertical. Don't want square thumbnails? You can also print a mosaic of 72 horizontally or vertically oriented photos. In Step 3 of the workflow, choose Horizontal or Vertical from the pop-up menu, as desired. But note that all of your images must have the same orientation; you can't mix horizontal and vertical photos.
There's one more advantage to going the all-horizontal or all-vertical route: the workflow will run much faster.
There are more tricks and modifications you can make for this workflow, and I'll share them next week. In the meantime, grab the archive and start posterizing!
You've tamed Tiger, now tame iLife. If you liked this tip, you'll love The Macintosh iLife '05, the latest edition of the world's top-selling iLife book. 345 full-color pages plus a two-hour, 43-minute instructional DVD that also contains an exclusive collection of Doug's AppleScripts for iTunes, GarageBand loops, tutorial files, and more—all for $23.09 on Amazon.com (34 percent off the cover price). Read a review, then order your copy.